Farmers Market Hose Systems: Vendor Setup Guide
By Hana Kim • 31st Mar

Setting up a watering system for a farmers market hose system that works across different vendor booths (with limited water access, shared faucets, and tight timelines) is a puzzle many vendors solve wrong, over and over. Most reach for whatever garden hose is on sale, connect it with crossed fingers, and spend Saturday morning troubleshooting leaks instead of arranging flowers. I've watched this cycle enough times in customer support to know there's a clearer path. A mobile vendor watering setup that actually works starts with one principle: compatibility prevents returns, and clarity saves your entire market day.
This guide walks you through every decision point for vendors managing pop-up market irrigation, from booth layout to nozzle choice, using a practical decision-tree approach that removes guesswork and keeps your displays hydrated without drama.
1. Audit Your Water Access and Layout Constraints
Before buying anything, understand your actual water picture. Walk your vendor space and answer these questions:
- How many water sources exist near your booth area? (Spigots, shared supply lines, or ground faucets.)
- What is the horizontal distance from the nearest faucet to the farthest plant you'll water? Measure it.
- Is the water source at the highest point of your layout, or will water flow uphill? Water doesn't climb elevation; it stalls.[2]
- How many separate watering zones do you need? (For example: perennial display, annual plugs, herbs, cut flowers.)
- Will your booth share a faucet with other vendors, or do you have sole access? Sharing demands a clean valve and hose timer.
This map becomes your from spigot to nozzle blueprint. To dial in run length precisely, use our optimal hose length calculator before you buy. I used to guess and waste Saturdays returning mismatched fittings. After the third trip, I built a one-page checklist from this exact audit. Neighbors now borrow that checklist and keep it on the fridge. You will too.
2. Choose Your Hose Type and Diameter for Portable Plant Hydration
For vendor booth watering, hose weight and kink resistance matter more than they do for permanent garden beds. You're coiling, uncoiling, moving the setup between markets, and possibly storing it in a van or truck bed.
Lay-flat hoses are the standard for mobile setups. They fold neatly, weigh less than traditional rubber hoses, and don't retain coil memory as badly. Look for hoses marketed as "flat hose" or "wrapped hose" with a reinforced polyester or nylon cover. Diameter choice:
- 5/8-inch hose: Lighter weight, easier to manage for one person, fits standard residential spigots and quick-connect setups. Trade-off: more friction loss over distance, so GPM (gallons per minute) drops if you run it 75+ feet.
- 3/4-inch hose: Heavier but delivers more water at the far end of a long run. If your booth is 40+ feet from the nearest faucet, 3/4-inch is worth the extra weight.
For most vendors with a booth footprint under 10×10 feet and a water source within 50 feet, 5/8-inch lay-flat is the sweet spot. If you're on the fence between 5/8 and 3/4, see our garden hose diameter guide with flow calculations by distance. It's lighter to coil between markets and still delivers solid flow to soaker systems or nozzles.
3. Map Your Fittings and Connectors - The from Spigot to Nozzle Framework
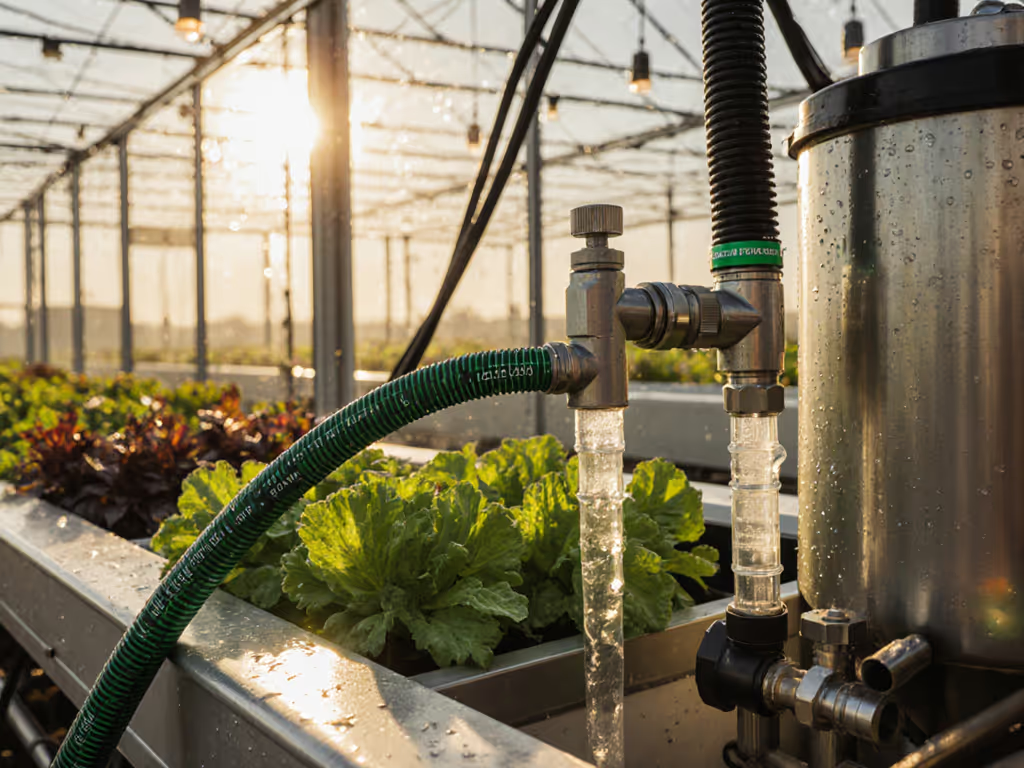
This is where compatibility saves or sinks you. Every leak, burst, and frustration I've witnessed in customer support tracks back to mismatched threads, wrong washer sizes, or quick-connects that don't seat properly. Start with the spigot, end with a click-fit finish.
At the water source (the spigot):
- Check your thread type. Most residential spigots use GHT (garden hose thread), the standard 3/4-inch male fitting. Confirm this before you buy anything.
- If you share a faucet with other vendors, use a backflow preventer immediately after the spigot. It prevents dirty water from flowing backward into the municipal supply. Look for the manufacturer's stamped directional arrow on the side. The arrow shows water flow direction.[1]
- Wrap the spigot threads with Teflon tape (thread-seal tape) clockwise, 2-3 layers, before attaching any adapter. This is non-negotiable for leak prevention.[1]
Your hose-to-spigot adapter:
If your hose has a female connector (the recessed end), screw it directly onto the spigot. Hand-tighten first, then use a pipe wrench to snug it (don't overtighten and crack the plastic fitting). If your hose connection is a barbed connector (looks like a ridged tube), you'll need a hose clamp to hold it in place.[1]
Quick-connect couplings (optional but recommended):
For temporary display watering across multiple market days, quick-disconnects save minutes and reduce connection fatigue. A male quick-connect screws onto your spigot (after the backflow preventer). A matching female connector attaches to your hose. When you're ready to deploy, press them together; they snap apart just as fast when you're done. This works beautifully if you're setting up and breaking down the same booth layout every week.
At the far end (your plants):
- If you're using soaker hose or drip tape for portable plant hydration, the end must be sealed with a male connector and end cap.[2]
- If you're attaching a nozzle or sprinkler, ensure the nozzle's female thread matches your hose's male thread (usually GHT, 3/4-inch).
4. Select a Y-Splitter or Multi-Outlet Timer for Zone Control
Most vendor booths water multiple plant types on different schedules. Annuals might need daily watering; perennials every two days. A pop-up market irrigation system with zone control keeps you from overwatering one group while the other dries out.
Simple Y-splitter:
Screw a brass Y-splitter onto the spigot (or onto a quick-connect male adapter). It splits one water source into two outlet ports. Each port can run a separate soaker circuit or nozzle line. Brass is worth the extra cost (it won't crack under sun exposure or freeze-thaw cycles the way plastic does).[1]
Multi-outlet timer (better for automated watering):
If you're away from the booth for stretches during market hours, a programmable or simple mechanical timer screws directly onto the spigot. A four-outlet timer lets you set independent schedules for up to four zones. Each zone can run for a set number of minutes, then shut off.[3] This is especially useful if you're coordinating with another vendor or need the system running while you're helping customers.
When installing a splitter or timer, wrap the spigot threads with Teflon tape and hand-tighten first. A loose connection will drip all day, wasting water and weakening the connection further as pressure builds.
5. Plan Your Water Layout with Soaker Hose and Drip Tape
For vendor booth watering of planted containers, beds, or potted displays, soaker hose and drip tape are far more efficient than overhead sprinklers. Water goes directly to soil, not into the air or onto leaves.
Soaker hose basics:[2]
- Unroll and flush the hose before attaching it to remove manufacturing debris.[2]
- Lay the hose in curves around plants, keeping it flat on the soil surface to avoid uneven watering.[2]
- Place the hose about 2 inches from plant stems; for new annuals with shallow roots, move it closer.[2]
- If you're running multiple rows of soaker hose, space them 12-18 inches apart on sandy soil, or 18-24 inches apart on clay or loam soil.[2]
- Maximum run length from a single water source is 150 feet. If your booth layout exceeds that, use a T-shaped female feeder connector at the water source to split flow into two separate circuits.[2]
Soaker hose layout decision tree:
- Straight-line planting (vegetables, herbs in rows)? Run soaker hose in straight lines parallel to the rows.[2]
- Randomly spaced plants or containers? Weave the hose in flowing curves among the plants.[2]
- After setup, secure the hose with metal garden stakes or landscape pins every 3-4 feet to keep it from shifting when you water.[2]
- Optional: cover the hose with 2 inches of mulch to hide it, retain moisture, and protect it from UV damage. Leave the end connecting to the water source accessible so you can disconnect quickly at the end of market hours.[2]
End cap and male connector:
When you've laid out your soaker circuit, cut off excess hose with sharp scissors, making sure the cut is clean and at a 90-degree angle.[2] Attach a male connector and end cap to seal the end.[2]
6. Add Pressure Regulation and Filtration for Reliable Flow
Soaker hose and drip tape are delicate. If water pressure exceeds 30-40 PSI, you'll blow out seals or split the hose. Most residential spigots deliver 40-80 PSI, far more than drip systems need.
Install a pressure regulator (also called a pressure reducer) immediately after the backflow preventer or Y-splitter, before your soaker hose. It steps the pressure down to 25-30 PSI (ideal for drip circuits). A regulator also stabilizes flow if your municipal pressure fluctuates throughout the day.[2]
Add an in-line filter (a screen or mesh inline filter) just upstream of your soaker hose to trap sediment and mineral particles that clog drip emitters. In hard-water areas, this prevents mineral buildup from fouling your system mid-market.
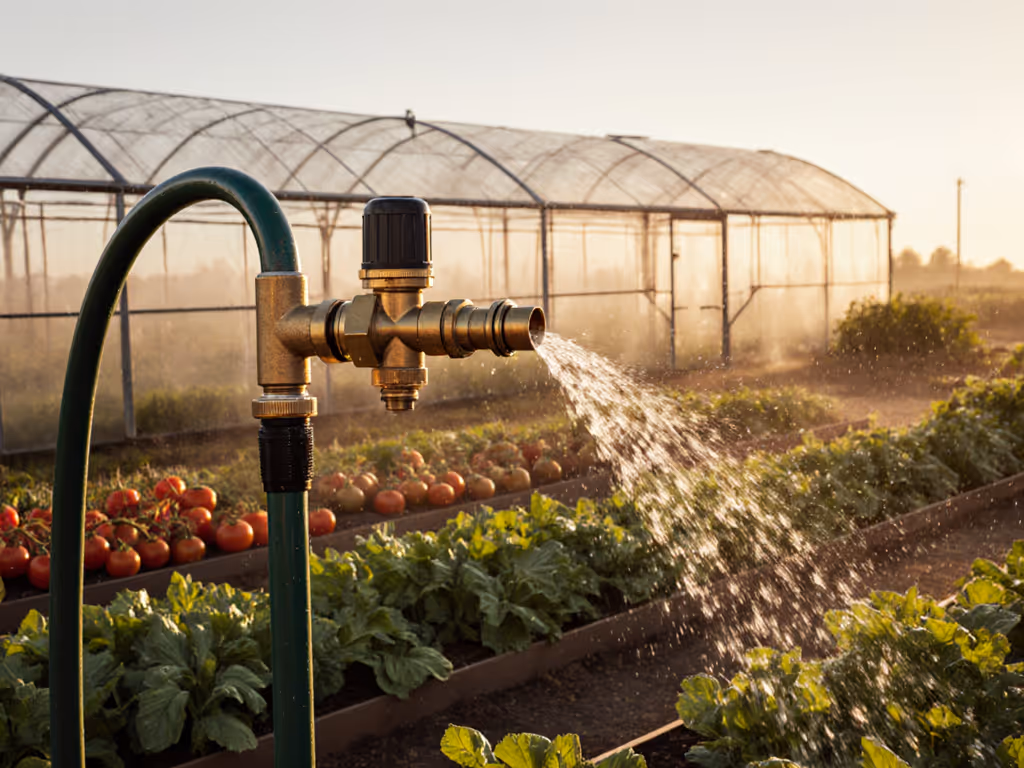
7. Choose the Right Nozzle for Finishing Tasks
Soaker hose handles the bulk of your booth watering, but you'll still need a nozzle for hand-watering, rinsing foliage, or topping up containers in a pinch. For comfort and reliability during long market days, choose from our leakproof ergonomic nozzle picks.
Nozzle traits to prioritize:
- Adjustable spray pattern: Fan, mist, stream, or shut-off modes in one nozzle give you flexibility without swapping attachments.
- Soft-touch or trigger lock: If you're watering for an hour or more, a trigger lock or latch prevents hand fatigue and lets you maintain a steady flow without squeezing the handle the whole time.
Related Articles